


Before your first move


Peach
Look first, move second
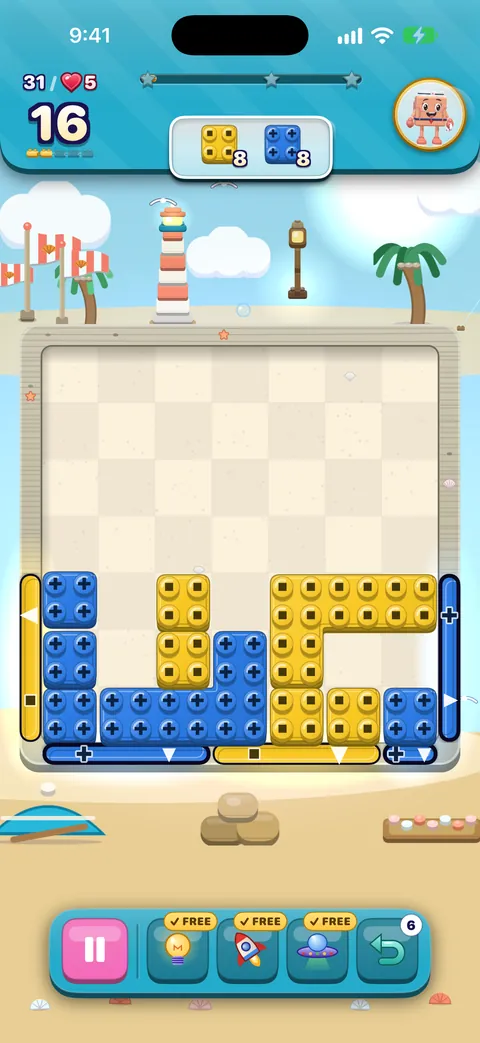
Most hard boards are lost in the first three moves, not the last three. Opening a board costs nothing, and leaving before your first move is always free, so take a full look before you touch anything.
- Read every goal in the order panel: which colours, how many, and whether there are crates, locks or moss to clear. A board in stages opens new gates when the first goals are done.
- Count your moves against the goals. Twenty moves for twenty red bricks means one-at-a-time slides will not be enough: you need lines.
- Find the gates. Note each gate’s colour and width, and whether it is iced, counted or sealed until a later stage.
- Spot what is stuck: bricks under a lid, in ice or behind a lock cannot move yet. Tap any blocker or lid for a one-line reminder of how it opens.
- Check if bricks fall. If they do, new bricks may drop in, and every match changes what is above it.
Slides or matches: spend each move where it counts most
A gate goal such as “send 12 red home” counts both the red bricks you slide out through the red gate and the red bricks you clear in lines. That changes the arithmetic:
| Move | Goal bricks for one move | Best for |
|---|---|---|
| Slide one brick home | 1 | A lone brick with a clear lane, or the last one or two of a goal. |
| Slide a long or big brick home | One for every cell it covers | Long and big bricks count every cell, so a 2×2 is four in one move. |
| Swap to make a line of 3 | 3 | Most of the board, most of the time. |
| Line of 4 or 5, or a shape | 4 or more, plus a special | Building specials that clear many more later. |
A board of three rows and four columns where nothing falls, with a red gate on the right edge of the middle row. Top row: yellow, empty, empty, green. Middle row: red (highlighted), blue, red, red. Bottom row: empty, empty, yellow, empty. The highlighted red brick swaps right with the blue brick, making a line of three red bricks. After the move, the three red bricks are gone, the one beside the red gate leaving through it, and the blue brick sits at the left of the middle row. All three count toward a red goal.
Wskazówka
A brick matched or blasted in the cell right in front of its own gate leaves through that gate. When a gate is counted, that matters: only bricks that pass through it use up its places, so choose which ones to send.
Free the blockers and open the gates
Blockers do not all open the same way. Making the right kind of line is what saves moves:
A board of two rows and four columns where nothing falls. Top row: a crate with 2 layers, then three empty cells. Bottom row: red, red, blue, red (highlighted). The highlighted red brick swaps left with the blue brick, making a line of three red bricks under the crate. After the move, the red bricks are gone, the crate has 1 layer left, and the blue brick sits at the right of the bottom row.
A board of two rows and four columns where nothing falls. Top row empty. Bottom row: red, a locked red brick, blue, red (highlighted). The highlighted red brick swaps left with the blue brick, so the line of three red bricks runs through the locked one. After the move, the two unlocked red bricks are gone, the lock is gone and its red brick stays in place, now free to move, and the blue brick sits at the right of the bottom row.
| Blocker | What opens it | Tactic |
|---|---|---|
| Crate | A line beside it, one layer per line. | Line up next to crates that wall in a gate lane first. |
| Ice | A line beside it. | Free iced goal bricks early; they cannot move until then. |
| Lock | A line through it. | Build the line around the locked brick; a line beside it does nothing. |
| Moss | A line beside it. | Moss creeps after any move that clears no moss, so keep clearing it, and do not leave it to spread. |
| Statue | Nothing: it stays. | Plan lanes around it. |
| Lid | Its own rule: a count, a colour, a key line, a number of moves or a key brick. | Read the lid before move one; see Sealed rooms and their lids. |
Every blocker, lid and gate is described in full in The blockers encyclopedia.
Iced, counted and staged gates
- Iced gate: thaws a little each time any brick goes home through any gate, and when pieces in front of it clear. Send other colours home early to open it sooner.
- Counted gate: takes only so many bricks, then shuts for good. Do not waste its places on bricks a match could clear instead.
- Staged gate: stays sealed until the second stage of goals begins. Do not spend moves lining up bricks for it in stage one.
A board of three rows and four columns. On the left edge of the middle row is an iced blue gate; on the right edge of the middle row is an open red gate. The middle row holds a blue brick at the left and a red brick (highlighted) at the right. The red brick slides right, out through the red gate. After the move, the red brick is gone and the blue gate has thawed and is open, so the blue brick can now slide left into it.
Falling boards: work low
On boards where bricks fall, a match near the bottom moves everything above it, and the fall can line up another match on its own: a cascade, which costs no extra move. A match near the top moves almost nothing. So, other things equal, work from the bottom up.
A board of four rows and three columns where bricks fall but no new ones arrive. Left column from the top: red, green, yellow (highlighted), green. Middle column: empty, empty, green, red. Right column: empty, empty, empty, red. The highlighted yellow brick swaps right with the green brick beside it, making a column of three green bricks on the left. They clear, the red brick at the top falls to the bottom row beside the two red bricks there, and that line of three red bricks clears as well. The yellow brick falls into the bottom row, which is all that is left.
- On falling boards you can slide sideways into a gap, or straight out through a gate. Use slides to set up lines a fall will complete.
- Where new bricks drop in, the top of the board is unknown; the bottom is what you can plan.
- On Corner Pieces and Quiet Puzzle boards, bricks fall but no new ones arrive, so every brick is all you will get. Count the bricks of each goal colour before you start.
Specials: make them, then keep them for a combo
| Make | Special | Best use |
|---|---|---|
| Four in a line | Line blaster | Clears a whole row or column, along the direction you moved. Aim it down a row full of goal bricks or crates. |
| An L, T or + shape | Bomb | Blasts the 3×3 square around it, twice. Good against clusters of blockers. |
| A 2×2 square | Homing dart | Flies to a piece a goal needs. Good for the last stubborn goal piece. |
| Five in a line | Colour bomb | Swap it with a colour to take every plain brick of that colour. |
A special fired alone is good; two swapped together are far better. If two specials sit close, try to bring them side by side and swap them into each other rather than tapping each one:
A board of three rows and four columns. Top row: green, yellow, empty, blue. Middle row: a red line blaster that fires across, a blue bomb (highlighted), empty, yellow. Bottom row: yellow, green, blue, red. An arrow shows the blue bomb swapping left into the red line blaster. Swapped together, they fire as a cross three rows and three columns wide.
| Swap together | Result |
|---|---|
| Line blaster + line blaster | A cross: one row and one column. |
| Line blaster + bomb | A cross three lanes wide. |
| Bomb + bomb | A 5×5 blast. |
| Dart + any special | The dart carries the special to its target. |
| Colour bomb + any special | Every brick of that colour becomes that special, and they all go off. |
| Colour bomb + colour bomb | The whole board. |
Wskazówka
Tapping a special to fire it where it stands uses a move, and so does a combo swap, so a combo is two specials’ worth of clearing for one move. More in Special bricks and combos.
Free boosters and the free undo
Every attempt comes with one free Hint, one free Rocket and one free UFO. They cannot be saved for later, so a board where you never touched them is a board you played with one hand behind your back.
- Hint
- Shows and says the best move. Use it early on an unfamiliar board to learn what the board wants, not only when you are stuck.
- Rocket
- Turns a plain brick into a line blaster that fires along its row. Choose a row with several goal bricks or blockers in it, ideally low on a falling board.
- UFO
- Beams one layer off a piece: a crate layer, ice, a lock, moss or a brick. Best on the single blocker that keeps a goal brick or a gate lane shut.
Dobrze wiedzieć
Boosters cannot pick shaped bricks or anything under a lid. Owned boosters keep, so save them for Hard, Super Hard and Boss boards. See Boosters, hints and Pause.
Undo as a way to look ahead
- The first undo on every board is free. Use it as a free look: try the move you are unsure about, and if it goes badly, take it back.
- Undo puts the board back exactly as it was before your move, and gives the move back.
- After the free one, undos come from a tank of up to five that refills by one every 25 minutes. Keep them for the end of a board, where one wasted move is the difference.
- Undo is cheaper than Restart. Restarting after a move ends the attempt and costs a life; an undo never does.
When to play on, and trying again
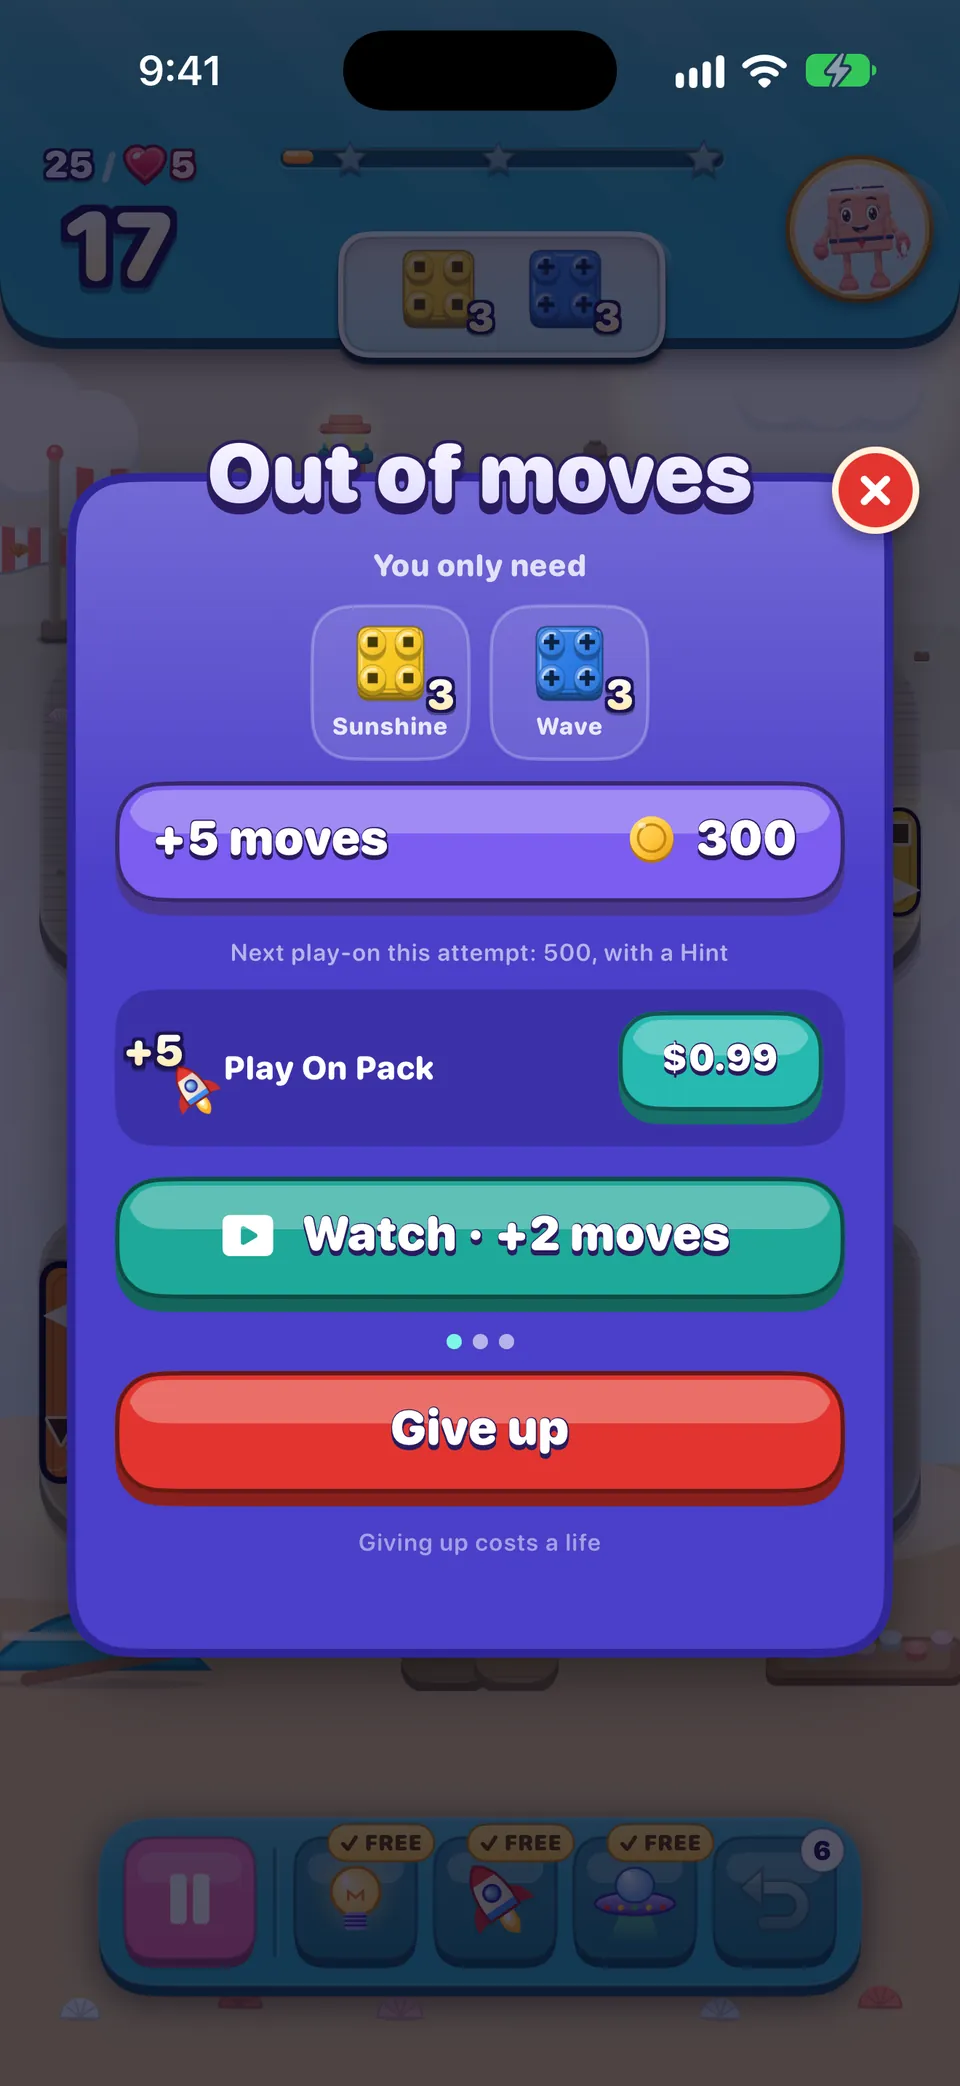
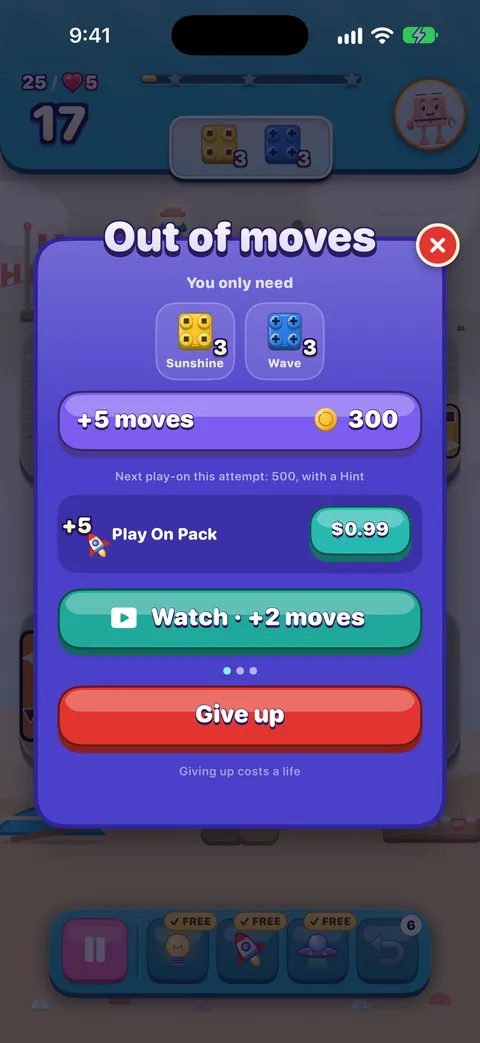
The out-of-moves screen shows exactly what is left. Read it before you choose. Playing on keeps this attempt alive, so it never costs a life; giving up uses one, and a life comes back in 30 minutes.
| What is left | A sensible choice |
|---|---|
| One or two goal pieces in easy reach | Play on: a free video (+2 moves), a saved +5 moves, or the first coin play-on (300 coins, +5 moves). |
| A few pieces, but a blocker in the way | The second play-on (500 coins) adds a Hint; the third (900) adds a UFO for that blocker. |
| Most of a goal still to do | Let it go. The attempt has taught you the board; your next one starts fresh. |
- The price climbs 300 → 500 → 900 within one attempt and resets with every new attempt.
- On a board you have tried several times, each play-on gives one extra move for every failed attempt after the third, up to +15.
- The current Brick Pass adds three free moves at the out-of-moves screen.
- Nothing paid is offered before level 6.
Full details in Out of moves.
Trying again: the helping hand
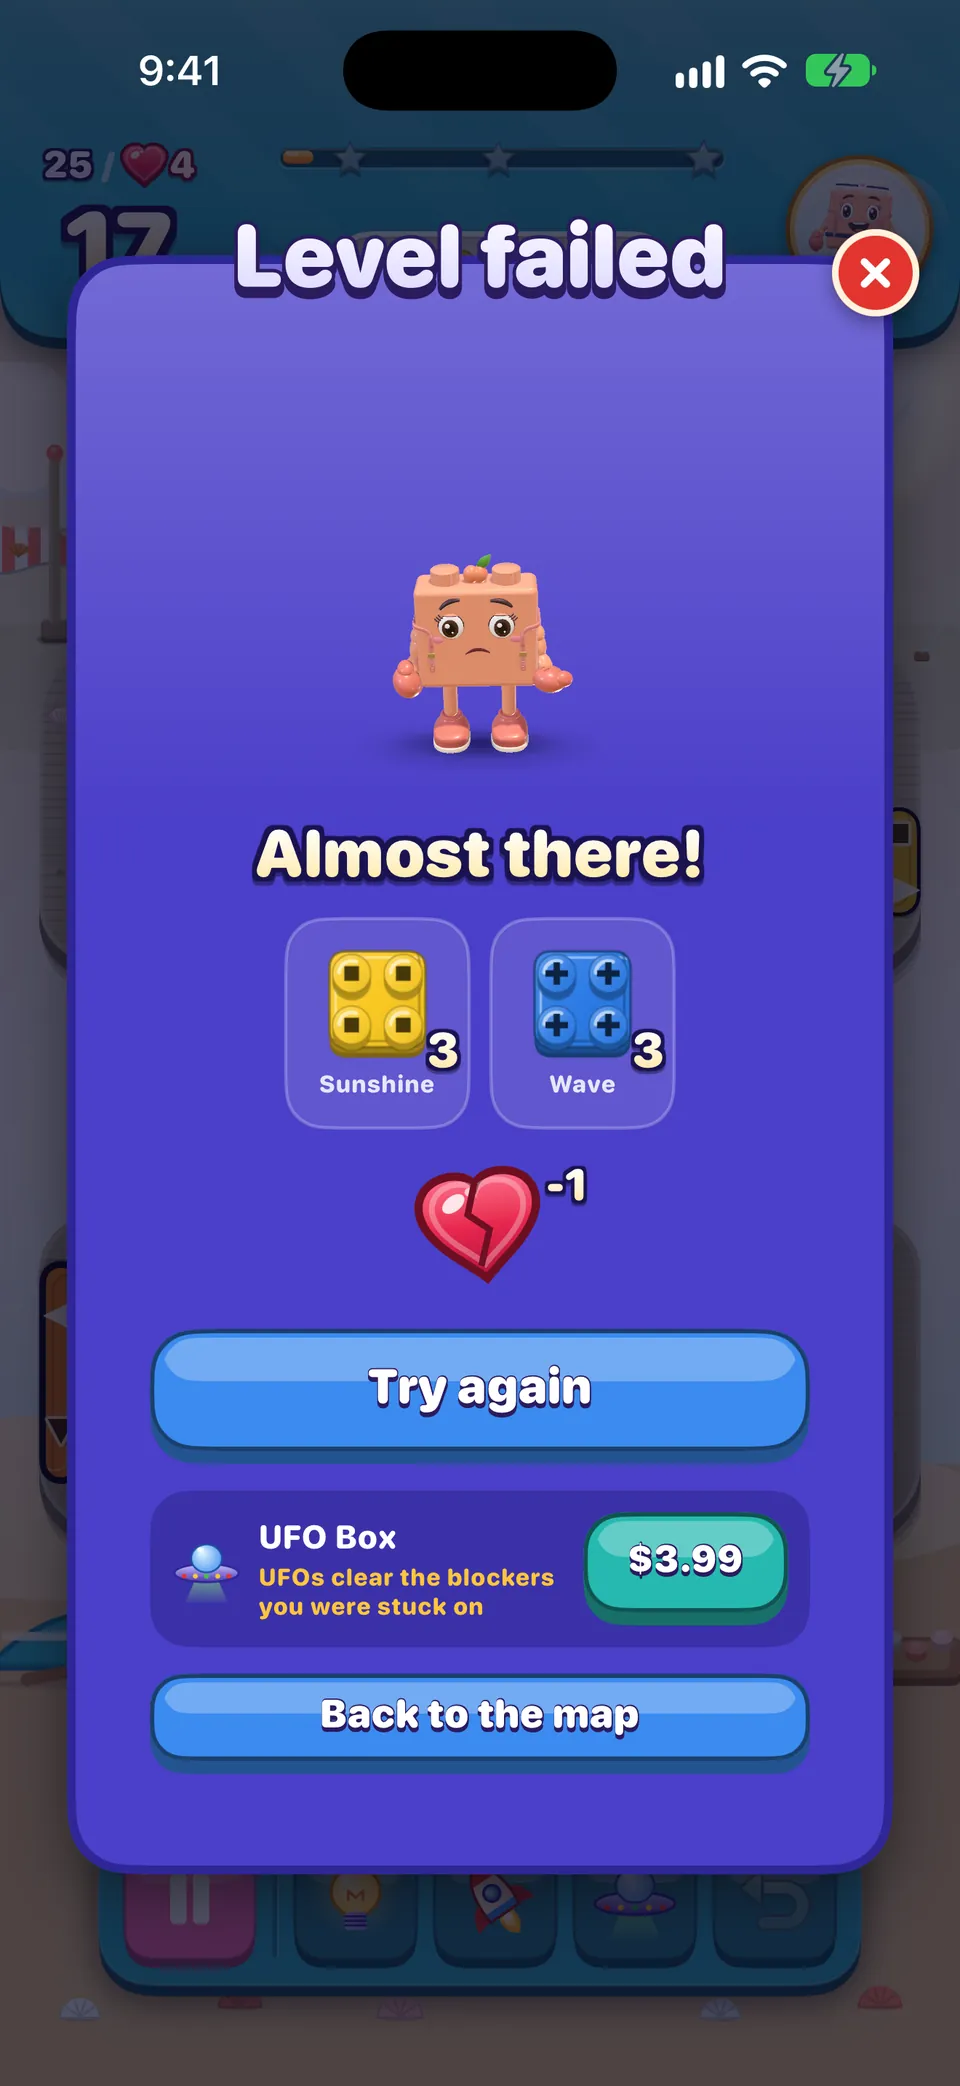
- After a loss, Level failed shows how close you came. Use what you saw: which goal ran out, which blocker took too long.
- From your sixth attempt at the same board, the game gives you 3 extra moves before you start: “A helping hand: 3 extra moves this try”. Once a day per board, free.
- From level 6, you can start the next try with a head start for 800 coins: a Rocket on the board and a free UFO.
- Still stuck? Look the level up in Help with a level: other players may have left a nudge.
What to expect from Hard, Super Hard and Boss
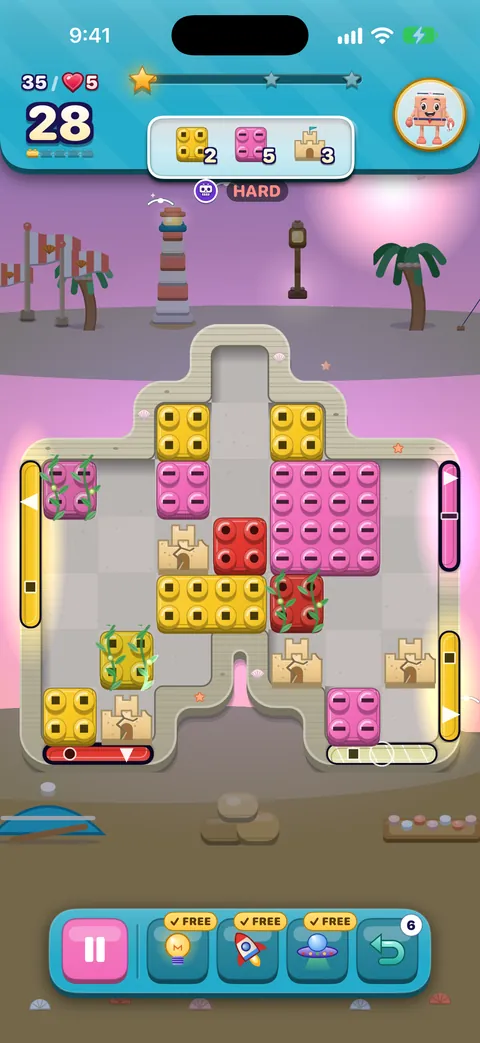
| Tier | What changes | Coins for a clear |
|---|---|---|
| Hard | Goals ask for about 15% more, and there are a few more obstacles. | 50 |
| Super Hard | Goals ask for about 30% more. | 80 |
| Boss | The last board of a chapter, from level 40. Goals ask for about 40% more. | 80 |
| Night | A board set after dark. It plays like a Hard board. | 50 |
Expect to need more than one attempt on Super Hard and Boss boards: that is how they are tuned, not a sign you are playing badly. Every board in the game has been cleared by a solver before release, so every one can be won.
Strategy with VoiceOver
- Start with the Board summary at the top: level, stage, goals and moves left. Double-tap it to hear the whole board with a hint.
- Use the rotors instead of swiping cell by cell. Goals finds the pieces your goals want; Pieces that can match finds every move that clears now; Blockers and Gates show what is in the way and where bricks can leave.
- Listen to a piece’s actions. Slides say how far they go and whether they leave through a gate, and working swaps come first, so the first few actions are often the plan.
- Set Announcement detail to Full on hard boards to hear every goal’s count after every move, so you never lose track.
- The two-finger double tap is a free hint that never uses a Hint booster. Ask as often as you like.
- Turn on Hold to confirm swaps if a slip could play a move you did not mean.
Dostępność
In 5.1 and 5.1.1, a card offering boosters can open while you read the board and move VoiceOver to the top. A two-finger scrub closes it and puts you back on the board; a fix is on its way. See Playing with VoiceOver and known issues.
The hard-board checklist
| Kiedy | Check |
|---|---|
| Before move one | Every goal read, moves counted, gates and their kinds found, frozen bricks and lids noted, falling or not. |
| Each move | Does this move count toward a goal, free a blocker, or set up a special? If none, find another. |
| Specials | Two near each other? Bring them together for a combo instead of firing them alone. |
| Free tools | Free Hint, Rocket and UFO used this attempt; free undo spent on a real doubt. |
| Last five moves | The board’s edge glows. Count exactly what is left and play the surest moves first. |
| Out of moves | Close? Play on, preferably with a free video. Far off? Let it go, and come back fresh. |
Rest is a strategy too
A board that beat you five times in a row will often fall the first time after a break. See Playing calmly.
Czy ten poradnik był pomocny?
Keep reading
Gra na planszy
Every part of the board screen, how sliding and swapping work, what counts as a move, how stars and score work, and what Hard, Super Hard, Boss and Night boards mean.Special bricks and combos: the complete guide
How to make every special brick, exactly what each one clears, the three ways to set them off, every combination of two specials, and how cascades, score, stars and the leftover-moves finish fit together.Every blocker, lid and gate, explained
What every obstacle on a board looks like, what it does and exactly how to clear or open it: crates, ice, locks, moss, statues, face-down bricks, keys, long and shaped bricks, the five lids, every kind of gate and portals.Boosters, hints and Pause
What Hint, Rocket, UFO and Undo do, the free ones you get on every board, how to get more, and everything in the Pause menu.Lives, running out of moves, and undos
When a life is used and when it is not, how lives come back, what the out-of-moves screen offers, the helping hand, the free daily try, and optional videos.Gra z VoiceOver
How the board reads, how to slide and swap with actions, the rotors, every gesture, what you hear after a move and how to get a free hint.
Każdą wiadomość czyta ktoś z zespołu. Staramy się odpowiadać w ciągu dwóch dni roboczych.
Nadal nie wiesz, jak dalej?
Nadal nie wiesz, jak dalej?
Zapytaj w społeczności. Zespół i inni gracze odpowiadają publicznie, a twój adres e-mail nigdy nie jest pokazywany.
Zapytaj społecznośćBłąd w grze?
Dobre zgłoszenie szybciej zostaje naprawione. Formularz błędu pyta dokładnie o to, czego potrzebujemy.
Zgłoś błądWolisz napisać prywatnie?
Formularz kontaktowy trafia prywatnie do tego samego zespołu. Używaj go w sprawie zakupów i spraw osobistych.
Skontaktuj się z pomocą